

- Create your CNAME for the server in DNS
- Import the SSL certificate and the certificate chain to the web server
- Launch IIS Manager
- On the SCSM portal site, click bindings
- Click Add
- Type: https
- IP Address: All Unassigned
- Port: 443
- Host Name: your CNAME you created
- SSL Certificate: The cert you imported
- Click OK
- In IIS Manager, Expand Sites and click on the Portal Website->Configuration Editor
- From the dropdown menu select system.webServer > security > authentication > windowsAuthentication
- Change “useAppPoolCredentials” to “True”
- Reset IIS
- On the client machine, Open Internet Explorer and add the SCSM portal site to trusted sites.
- Navigate to Tools->Internet Options->Security->Custom Level->Select “Automatic login with current user name and password”.
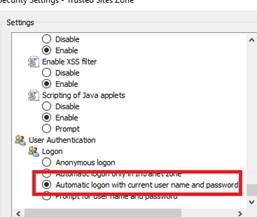
- You can also update your trusted sites in the organization through group policy


After doing this, your SCSM portal site should be working correctly over https
No comments:
Post a Comment
Note: Only a member of this blog may post a comment.