
1) Install .NET Framework 4.8
https://support.microsoft.com/en-us/topic/microsoft-net-framework-4-8-offline-installer-for-windows-9d23f658-3b97-68ab-d013-aa3c3e7495e0
4) Removed the old Exchange Connector from the database
select * from MT_Connector
Then find the BaseManagedEntityID of the Exchange Connector. Run the query below to remove the connector, changing the @EntityID in the query below to the ID you got from the query you just ran.
DECLARE @EntityId uniqueidentifier;
DECLARE @TimeGenerated datetime;
-- change "GUID" to the ID of the invalid entity
SET @EntityId = '8358F5C6-AD98-B04F-2F5B-C7A6311746C0';
SET @TimeGenerated = getutcdate();
BEGIN TRANSACTION
EXEC dbo.p_TypedManagedEntityDelete @EntityId, @TimeGenerated;
COMMIT TRANSACTION
5) Install Fiddler to track https traffic during the O365 login
Go to SSMS and run this query:
Select Name, is_broker_enabled, Compatibility_Level, User_Access_Desc from sys.databases Where name = 'ServiceManager'
Locate the following registry subkey:
HKEY_LOCAL_MACHINE\System\CurrentControlSet\Control\SecurityProviders\SCHANNEL\Protocols
Right-click the Protocol key, point to New, and then click Key.
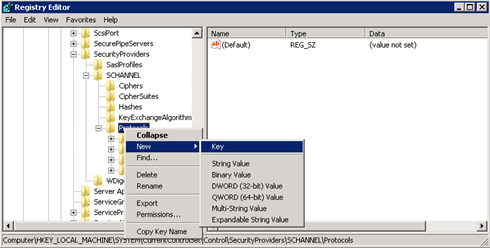
Type SSL 3, and then press Enter.
Repeat steps 3 and 4 to create keys for TLS 0, TLS 1.1, and TLS 1.2. These keys resemble directories.
Create a Client key and a Server key under each of the SSL 3, TLS 1.0, TLS 1.1, and TLS 1.2 keys.
To enable a protocol, create the DWORD value under each Client and Server key as follows:
DisabledByDefault [Value = 0]
Enabled [Value = 1]
To disable a protocol, change the DWORD value under each Client and Server key as follows:DisabledByDefault [Value = 1]
Enabled [Value = 0]- To enable the installation to support the TLS 1.2 protocol, follow these steps:
Start Registry Editor. To do this, right-click Start, type regedit in the Run box, and then click OK.
Locate the following registry subkey:
HKEY_LOCAL_MACHINE\SOFTWARE\Microsoft\.NETFramework\v4.0.30319
Create the following DWORD value under this key:
SchUseStrongCrypto [Value = 1]
Locate the following registry subkey:
HKEY_LOCAL_MACHINE\SOFTWARE\WOW6432Node\Microsoft\.NETFramework\v4.0.30319
Create the following DWORD value under this key:
SchUseStrongCrypto [Value = 1]
Restart the system.
0 comments:
Post a Comment
Note: Only a member of this blog may post a comment.